My projects have disappeared
Problem: When you start Wordfast Pro, one or more of your projects in the Project List screen appear greyed out and cannot be opened. The project name is displayed as Unknown Project.
Cause: The projects have been moved/deleted/renamed/modified outside of Wordfast Pro.
Explanation: When you create a project in Wordfast Pro, it is saved in the location you have specified or in the default location. If you move or rename the project at a later time outside of Wordfast Pro, the program will no longer be able to find it because it doesn't know the new location and/or name of the project. To show this, Wordfast Pro now displays Unknown Project and the project details are greyed out.
This can also happen if your projects are saved in a folder that is synchronised/backed up to a cloud service using an app such as Dropbox, iCloud, MS OneDrive, Google Drive. These apps can modify or delete one or more of the files comprising a Wordfast Pro project, especially if the app starts syncing while Wordfast Pro is running. This often corrupts the project and although you have not moved or renamed it, the result is the same. The screenshot above shows projects that have "disappeared" because they were saved in a Dropbox folder.
Solution: If you have moved or renamed your project, in order to add it back to Wordfast Pro, first make sure you know its new location and/or name. Then:
- Start Wordfast Pro.
- Click the greyed out project line to select it.
- Click the Remove button.
- Click Add Project and browse to the new location or the renamed project.
- Select the project and click OK. It should now appear in the list with its (new) name and the details should not be greyed out.
If the "disappearance" was caused by a cloud app:
- Shut down Wordfast Pro.
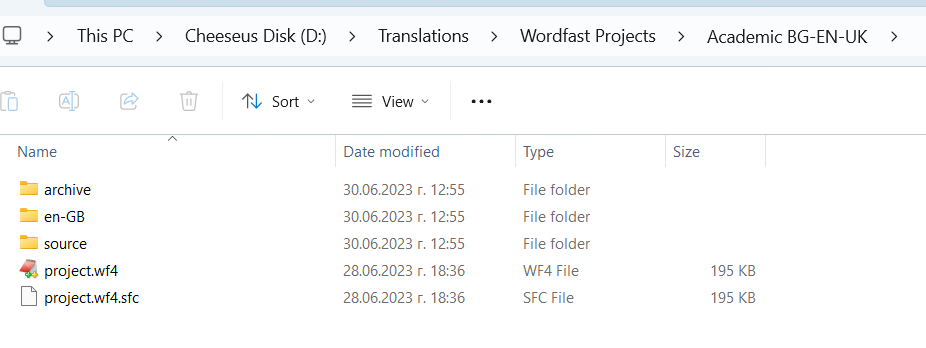
- Try to restore the most recent backed-up version of your project using the corresponding function of your cloud backup app. Most commonly, these apps will delete or damage the "project.wf4" file, which is located inside the project folder. Restoring this file should be sufficient. If this file is missing but the "project.wf4.sfc" file is present, make a copy of it and rename the copy to "project.wf4". If this doesn't help, the project cannot be recovered.
- When ready, shut down the cloud backup app.
- Copy the project to a different location. We recommend using the default project folder (Windows: C:\Users\[your-username]\WordfastPro\projects | Mac: /Users/[your-username]/WordfastPro/projects).
- Start Wordfast Pro and add the project as described above. If the project was not corrupted by the cloud backup app, it should add without problems.
Advanced Solution:
A Wordfast Pro project has the following structure:
- A containing folder that has the same names as the project
- A subfolder whose name corresponds to the project’s target language code, e.g. en-gb
- A subfolder called source
- A subfolder called archive (optional, if files hve been moved to archive)
- A subfolder called references (optional, if reference files have been added to the project)
- A file called project.wf4
- A file called project.wf4.sfc
Steps:
- To open the project, on Wordfast Pro’s Project List screen, right click an “Unknown Project” and select Open Location. This will open the folder containing your project (if it exists in the location that Wordfast Pro remembers).
- Open the source folder and take note of the source files that have added to this project.
- In Wordfast Pro, create a new project. Give it a name that is similar to the missing project but not exactly the same.
- Add to the new project the same source files as in the missing project.
- Close Wordfast Pro.
- Return to the original missing project and open the subfolder whose name corresponds to the project’s target language.
- Inside this, you’ll see a subfolder called txlf. Open it.
- Copy all TXLF files – or just the files you wish to restore.
- Open the newly created project’s folder and go to the same subfolder, e.g. the project’s target language, then go to the txlf subfolder.
- Paste the TXLF files you copied above.
- Start Wordfast Pro and open the newly created project.
- Click the Recalculate Progress button. The files in the project should now show the same degree of completion as the files in the missing project.
NB! Never save any Wordfast Pro resources (projects, TMs, glossaries, blocklists) in folders on your computer that are backed up using an app such as Dropbox, iCloud, MS OneDrive, Google Drive. If you do, you risk losing your work.

