Difference between revisions of "Using Excel or Word Glossaries"
m |
m |
||
| Line 16: | Line 16: | ||
# Now, you can close Excel without saving (as you have already saved the glossary).<ref>This [http://www.wordfast.com/tips_and_tricks/excel/excel2wf.htm video] (by Yasmin Moslem) illustrates how to convert an Excel glossary to Wordfast glossary.</ref> | # Now, you can close Excel without saving (as you have already saved the glossary).<ref>This [http://www.wordfast.com/tips_and_tricks/excel/excel2wf.htm video] (by Yasmin Moslem) illustrates how to convert an Excel glossary to Wordfast glossary.</ref> | ||
| − | [[File:excel test1.png]] | + | [[File:excel test1.png|500px]] |
Revision as of 21:18, 4 February 2019
WFC and WFP3 use a tab-delimited text file format for glossaries. WFP5 and above uses a SOLR database format for its glossaries; however, it can import glossaries that are in a tab-delimited text file format.
In other words, if you have a glossary in a Word document table or a glossary in an Excel file, you need to start by converting it to a tab-delimited text file. The first column should contain source word(s), the second column the target word(s), and the third column can optionally contain a description or other meta-data related to the terms.
Contents
Converting Glossaries for use in Wordfast
Excel Glossaries
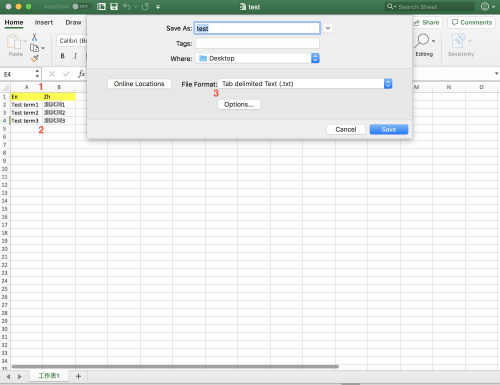
- Make sure that your Excel file only includes 2 columns: one for the source terms and the other for the target terms.
- Make sure that each field includes only the term (in the form expected to appear in original texts); omit any notes or unnecessary additions.
- From the Excel File menu > Save as, choose "Tab-delimited" as your file type. Note: If your language pair includes special characters that are spoilt after converting into a txt file, you can select "Unicode Text", instead.
- Click OK if a message prompts: "The selected file type does not support multiple workbooks that contain multiple sheets. To save only the active sheet, click OK."
- Click Yes if a message prompts: "(The file) may contain features that are not compatible with Text (Tab-delimited). Do you want to keep the workbook in this format."
- Now, you can close Excel without saving (as you have already saved the glossary).[1]
Word Table Glossaries
- Make sure that your table includes only 2 columns, one for the source terms and the other for the target terms.
- Make sure that each field includes only the term (in the form expected to appear in original texts); omit any notes or unnecessary additions.
- Word 2000, XP or 2003: From the Table menu, select: Convert Table to Text, and Separate text with: Tabs. Word 2007, 2010 or 2011: Go to Layout pane and click Convert Table to Text.
- Click the File menu (or the MS logo of Word 2007), click Save as and from "Save As Type", and select "Plain Text" (or "Text Only"). (Note: Use "Other encoding" -> "Unicode" if your language requires that).
Loading/Importing a tab-delimited text file glossary
Wordfast Classic
- Go to the Terminology tab and any glossary sub-tab.
- Click Select, and select the (.txt) file you obtained from the conversion process above.
Wordfast Pro 3
- In your project, click Project Terminology > Import.[2]
Wordfast Pro 5 or above
- Open a project.
- Click on the Project Terminology tab.
- Click on the Import Glossary icon.
- Select "Tab delimited" as the File Type.
- Click on Browse… to navigate to and select the tab-delimited text file glossary.
- Chose to create a new glossary or import it into an existing one.
References
--Yasmin Moslem, 29 December 2011
Updated by Byron, 10 January 2019
Version: Wordfast Pro 5.7
Operating System: macOS
